
 47 minutes ago
6

The post 24 Fridge Organization Ideas That Stop the Sunday Produce Toss appeared first on Penny Pinchin' Mom.
Every Sunday looks the same: pulling wilted spinach and forgotten peppers out of the crisper drawer, tossing produce you swore you’d use. I used to buy bagged salad every week with good intentions, then find it liquified behind the milk seven days later because I couldn’t see past the ketchup bottles up front.
Fridge organization fixes this by giving everything a zone instead of a random spot. An eat-first bin at eye level means that spinach gets used instead of buried. A kids’ reach shelf lets your kids grab their own snacks without raiding the raw chicken shelf. And mapping your zones on paper first, before you move a single shelf, saves you from rearranging everything twice. Most of the fridge organization ideas below cost nothing but ten minutes and a container you already own.
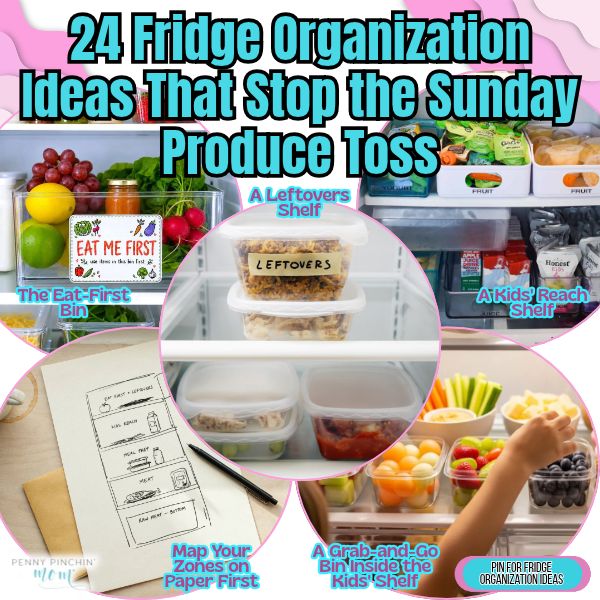
Set up the zones
1. The Eat-First Bin
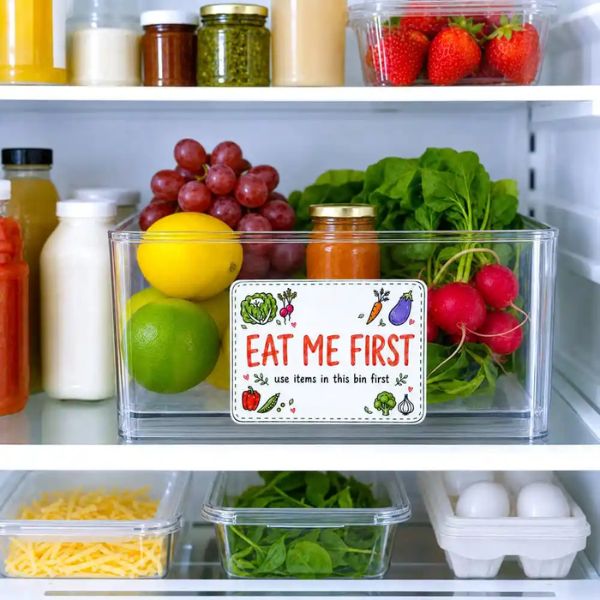
Anything on a short clock goes in one bin at the front of your eye-level shelf: the half-used sour cream, the three sad carrots, Sunday’s rice. $0 if you use a container already in the house. A plastic shoebox, a dishpan, the glass casserole dish whose lid disappeared years ago. If you’d rather buy something clear, Dollar Tree carries bins from about $1.25 to $5, and one is plenty for a standard shelf.
Fill it when you unload groceries and again at the weekly reset, moving anything that needs eating this week to the front of it.
This one holds up past week one because it’s the first thing your eyes land on when the door opens. Dinner starts there by default instead of starting with whatever’s newest.
2. A Leftovers Shelf
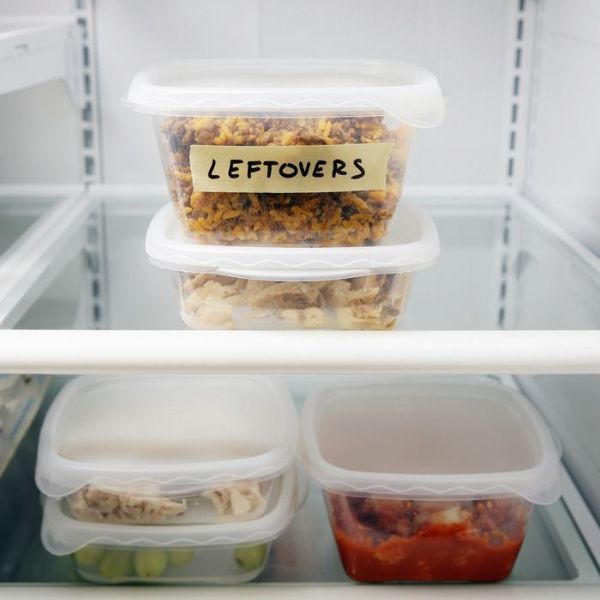
Give one shelf a single job and stop letting leftovers scatter across three zones where they turn into science projects. $0. You need the shelf you already have, the containers you already stack, and a roll of masking tape with a marker for the date.
I keep mine at eye level, right beside the eat-first bin, because leftovers and short-clock produce are the same category of food: eat it now. Leftovers hold 3 to 4 days in the fridge, so the date tells you whether tonight’s answer is “reheat this” or “toss it.”
What makes it last is the boundary. Nothing else moves onto that shelf, so an empty leftovers shelf is a real, visible signal that the fridge has been eaten down.
3. A Kids’ Reach Shelf
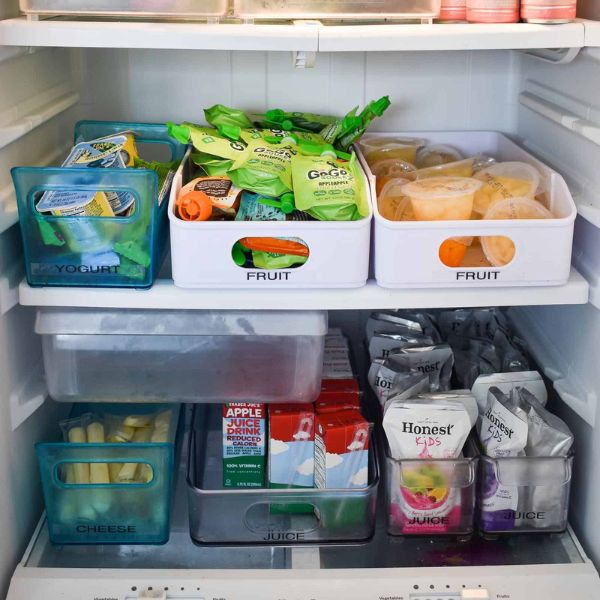
When the grandkids come straight here after school pickup, the first words out of their mouths are “can I have a snack,” and the answer is yes, go get it. $0. Clear one middle shelf at their eye level and park approved things there: yogurt tubes, string cheese, cut fruit in a lidded container, water bottles.
Safety matters more than cuteness here. This shelf sits above the raw-meat shelf, never on the bottom, so nothing can drip down onto food they’ll eat as-is.
The system survives because it removes you from the transaction. Restock it once a week, and the kids keep serving themselves without opening every drawer looking.
4. Map Your Zones on Paper First
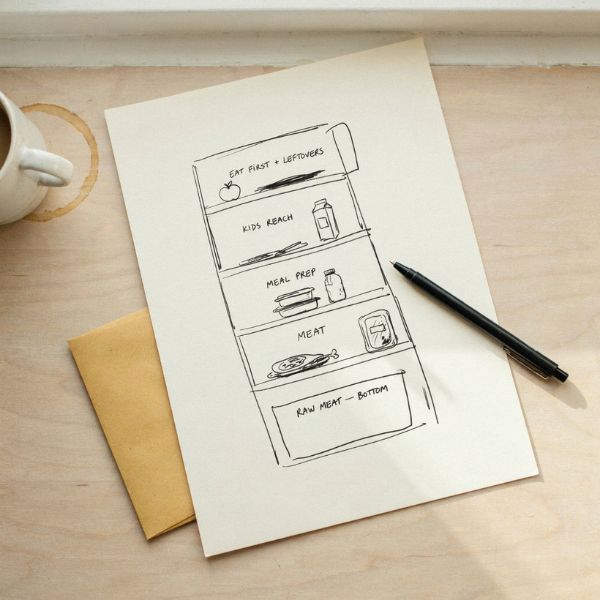
Ten minutes with a scrap of paper saves you from rearranging the same four shelves three Sundays in a row. $0. All you need is an envelope from the recycling and a pen.
Sketch the shelves as boxes. Write in what each one does: eat-first bin and leftovers at eye level, kids’ reach shelf in the middle above the meat, meal-prep on its own shelf, raw meat on the bottom. Then move food to match the paper instead of moving it by feel.
Keeping the sketch on the counter through the first week helps everyone else in the house learn the layout. A fridge that looks nice for a week is a clean-out. A fridge where every item has a named address is refrigerator organization you can hand off to your husband.
5. A Grab-and-Go Bin Inside the Kids’ Shelf
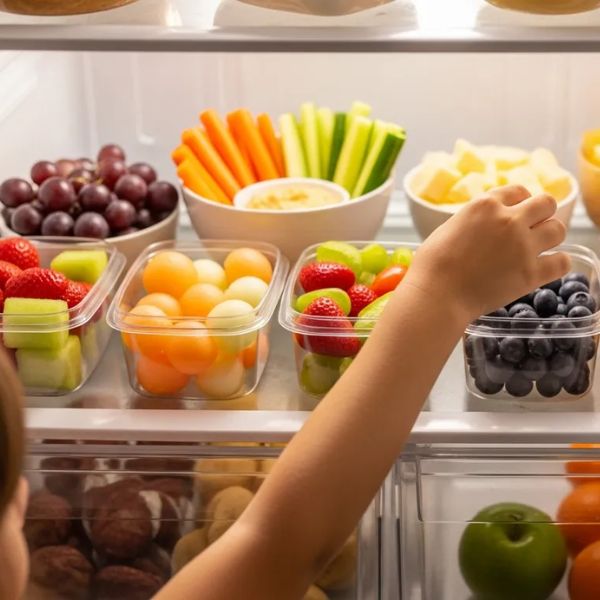
A zone within a zone sounds like overkill until the morning someone needs a lunch packed in four minutes. $0 using a shoebox, a dishpan, or a cardboard produce flat from the grocery store with the sides trimmed down.
Set one bin on the kids’ reach shelf and load it with the lunchbox pieces that live cold: yogurt cups, cheese sticks, applesauce pouches, a container of grapes. One bin per kid works if you’ve got more than one lunch going out the door, and Dollar Tree bins at about $1.25 each make that painless.
It stays functional because it’s refilled from the same grocery run every week, so nobody has to go hunting behind the condiments.
6. The FoodKeeper App
Free to download, and it settles the arguments your eyes can’t. The USDA’s FoodKeeper app tells you how long specific foods keep, which is exactly the question the eat-first bin asks every week: what actually needs eating first?
Back when we were paying off debt, I guessed. I’d sniff something, hesitate, and toss it anyway, which meant I threw away food that was fine and kept food that wasn’t. Checking a reliable source instead of guessing stopped both mistakes.
Use it when you’re loading your zones, not when you’re standing there at 6 p.m. deciding. $0 and nothing to buy. The system sticks because it builds your judgment. After a few weeks, you know your own staples without opening the app.
7. Leave One Open Spot in Every Zone
Every zone needs a little air, and a fridge packed wall to wall is how food disappears into the back and comes out fuzzy. $0, and it costs you nothing but restraint at the grocery store.
Leave a gap the size of a casserole dish on the leftovers shelf and a few inches at the front of the eat-first bin. Air needs to move for the fridge to hold at 40°F or below anyway, so the empty space is doing real work.
That open spot is also where the big pot goes on a busy week, instead of landing wherever it fits and shoving the zones out of alignment. The layout survives a hectic week because it was built with room to absorb one.
Top and middle shelves
8. Containers You Already Own
A matching set of fridge bins runs about $30 to $60 at Target, and not one of those bins makes anybody eat the leftover chili. Deli tubs, washed spaghetti sauce jars, quart yogurt containers, and the clamshell your rotisserie chicken came in do the same work for $0.
What you need: four or five containers you were about to recycle, washed and lids kept. Group like with like. Snack tub, cut-fruit tub, breakfast tub.
The real reason mismatched works better: you’ll actually replace one when it cracks or stains instead of leaving a gap in a set you paid for. A system that survives a broken lid is a system that survives the year.
9. Shelf Risers on the Tall Shelf
A two-pack of wire shelf risers costs about $10 to $20 at Target or on Amazon, and one pack is plenty for a standard shelf. They’re the one purchase on this list worth making, and only if you have a shelf with six inches of dead air above the yogurt.
What you need: a tape measure from the junk drawer first. Measure shelf width and the height of what you’re storing before you buy, because risers that don’t fit come straight back out.
Load the riser with small, light, single-layer items: yogurt cups, cheese sticks, little jars. Heavy casserole dishes stay on the shelf itself.
A riser keeps working because it turns one deep pile into two visible rows, and visible food gets eaten.
10. Move the Shelf Before You Buy Anything
Check whether your shelves move before you spend a dime. Most glass fridge shelves lift straight out and reseat on a different set of brackets, and almost nobody uses that feature after the delivery truck leaves.
Drop one shelf two inches to fit the milk jug standing upright, and raise another so the deli drawer stops jamming. $0, about ten minutes, and the only thing you need is an empty counter to set the shelves on while you work.
What you need: your own two hands and a towel for the glass.
Why it holds up: nothing is balanced on anything. When the shelf height actually matches what lives on it, things stop getting shoved sideways and forgotten behind the orange juice.
11. If You Can’t See It, You Won’t Eat It
Opening three identical opaque tubs to find the leftover chicken is how leftover chicken becomes Sunday’s trash. Clear beats pretty every time.
What you need: the glass jars and clear takeout containers already in your cabinet. Use those for anything with a short clock on it, and save the opaque plastic for butter, shredded cheese, and other things you’d recognize blind. $0.
If you want to add a few, a basic glass storage set comes in under $25 at Walmart, but it’s optional, not required.
This one holds up past the first week because it removes a step. Nobody has to open, peek, reseal, and re-stack just to answer the question of what’s for lunch.
12. Keep the Front Row One Container Deep
Anything pushed behind something else is gone. Not technically, but functionally, which amounts to the same wilted result on Sunday.
Give the front edge of each eye-level shelf a single row of containers with nothing parked in front of them. Taller items, backups, and anything with a long shelf life go behind. $0, since this is a placement habit and not a product.
What you need: five minutes and a willingness to pull things forward rather than stuff new groceries in front of old ones.
Why it survives the week: every time you take something out, the gap is obvious, so you slide the next thing up without thinking about it. The shelf re-faces itself.
13. Corral the Drinks So They Stop Blocking the View
Water bottles have a way of multiplying on the top shelf, especially with grandkids in and out of the house, and every one of them ends up blocking something you meant to eat.
Round them up. A cut-down 12-pack cardboard box, a cardboard soda carrier, or a dishpan you already own holds the loose bottles and cans in one block you can lift out with one hand. $0. If you’d rather buy, Dollar Tree has shoebox-size bins around $1.25, and a stacking can dispenser totals maybe $10 to $15 at Walmart.
One container per fridge handles it.
The payoff lasts because drinks are the thing most likely to drift. Giving them a hard boundary protects the eye-level real estate you just set up.
Bottom shelf and crisper drawers
14. A Thermometer So You Know the Fridge Actually Runs Cold
Your fridge dial says “4” or “medium,” which tells you nothing about the actual temperature inside. A fridge that drifts up to 45°F will spoil produce faster than any storage trick can fix.
A standalone refrigerator thermometer runs about $6 to $10 at Walmart or on Amazon, and you need exactly one. Set it on the bottom shelf, where the meat tray lives, and read it the next morning. You want 40°F or below.
This is the one item on this list I’d call a real purchase, and it’s the cheapest insurance in the whole kitchen.
It keeps mattering after week one because fridges drift. Door seals loosen, vents get blocked by a casserole dish, the compressor ages. Glancing at a number once a week takes two seconds and tells you whether the rest of your zones have a fighting chance.
15. The High-Humidity Crisper Drawer
Back when my kids were little, I bought a bag of lettuce every single week and threw out most of it every single week. I never once touched the little slider on the crisper drawer, because I assumed it was decorative.
It isn’t. Slide it closed to “high humidity,” and that drawer traps moisture. Leafy greens, spinach, lettuce, broccoli, cucumbers, green beans, and carrots all belong in there, because they wilt when they dry out.
Cost: $0. You already own the drawer and the setting is built in.
What you need is thirty seconds and a finger. That’s the whole project.
This one holds up better than almost anything else on the list because it isn’t a habit. You set it once, and it stays set even when the drawer gets emptied, refilled, and emptied again.
16. What Doesn’t Belong in the Fridge at All
Four things in your fridge right now would be better off on the counter: whole uncut potatoes, whole onions, tomatoes, and bananas that aren’t ripe yet.
Cold turns potato starch to sugar and makes them gritty. Onions soften and sprout. Tomatoes go mealy and lose flavor. Bananas stop ripening, and the peels blacken. Once you cut into a tomato or an onion, though, the leftover half does go in the fridge, wrapped or in a covered container.
What you need is a bowl you already own and a spot on the counter. $0, and it actually gives you back space.
This stays fixed because it’s subtraction, not maintenance. Pulling those four things out permanently frees up the drawer space your greens needed all along.
17. Herbs Standing in a Jar of Water
Cilantro turns to slime in its grocery bag within about three days, and parsley isn’t much better. Treat both like cut flowers instead.
Grab a jar out of the recycling; a clean salsa jar or a pint canning jar works fine. Trim a bit off the stems, stand the bunch in an inch of water, and drape the produce bag loosely over the leaves. Set it on a shelf, not in the crisper drawer, where you’ll actually see it. Cost: $0.
Basil is the exception. It sulks in the cold and turns black, so keep that jar on the counter.
Change the water when it goes cloudy, roughly every few days. Herbs sitting upright at eye level get snipped into dinner. Herbs flattened under a package of cheese do not.
18. Berries Stored Dry, Washed Right Before You Eat Them
Strawberries don’t go fuzzy because they’re old. They go fuzzy because they’re damp, and washing them before you put them away is the fastest way to guarantee it.
The grandkids were over a few weekends back, and I’d bought strawberries specifically for them. Rinsed the whole container at the sink Friday, found soft spots Sunday, and nobody had eaten a single one.
Now they go in dry. Line any container you already own, a deli tub or a glass storage dish, with a paper towel, add the berries unwashed, and leave the lid slightly loose so air moves. $0 if you’re using what’s on hand.
Rinse only the handful you’re about to eat. Once the rule becomes “wash at the bowl, not at the sink,” it sticks, because it’s less work than what you were doing before.
The door
19. Labels That Survive a Week
Masking tape and a marker beat any label maker in a fridge, because condensation peels sticker labels right off by Wednesday. Pull the roll out of your junk drawer, and you’re at $0. If you don’t have any, a roll costs around $1.25 at Dollar Tree or about $2 at Walmart, and one roll lasts most of a year.
Write directly on the tape, not the lid, and stick it to the side of the container where you’ll see it without lifting anything out. Painter’s tape works too and peels clean.
The reason this survives past week one is that it takes four seconds and no equipment. Systems fail when they require hunting for a gadget.
20. Date Everything You Open or Cook
Back when we were paying off that $37,000, I started writing the date on every opened jar and every container of leftovers, because tossing food felt exactly like tossing dollars out the back door. I still do it on meal planning Sundays, by choice now rather than necessity.
Cost: $0. You already have the tape and marker from the last idea. Write the date you opened it or cooked it, not the date it expires, since you’ll never remember which shelf life applies to what.
Dates end the sniff-and-guess routine at the counter. That’s what keeps the leftovers shelf moving instead of quietly turning into storage.
21. A Use-It-Up List on the Fridge
If you can’t remember what’s in there while you’re standing at the stove deciding what to cook, the fridge may as well be empty. An index card and a magnet you already own fix that for $0. A small dry-erase board, I spend about $1.25 for one at Dollar Tree, works if you’d rather wipe than rewrite, and dollar store finds for fridge organization rarely get simpler than that.
List only what needs eating this week: half a rotisserie chicken, three bell peppers, the sour cream you opened Tuesday. Cross items off as they go.
It keeps working because it’s two inches from the handle. You read it whether you meant to or not.
22. First In, First Out When You Unload Groceries
Unloading in a hurry is exactly how last week’s yogurt ends up buried behind this week’s. Before anything new goes in, slide the older containers to the front and set the new ones behind them. That’s first in, first out, and it adds maybe 90 seconds to the whole unload.
Cost: $0. What you need is the counter space to set two or three bags down instead of shoving things straight onto shelves.
For the full shelf-by-shelf unload order, including where raw meat and dairy land, see How to Organize a Fridge So Food Stops Going Bad Before You Cook It.
Done once a week, the back of the fridge stops being a graveyard.
23. Small, Side-by-Side, and French Door Fridges
Not every refrigerator fails the same way. Small fridge organization means going vertical: stack two shallow bins where one tall shelf space is wasted, and skip anything wide. Side by side fridge organization is a narrow-column problem, so group by category top to bottom instead of side to side, because you only have about 15 inches of width to work with. French door fridge organization is the opposite, with wide shallow shelves where food vanishes in the back corners, so pull-out bins matter more than risers.
Cost: $0 if you use containers on hand, or $1.25 to $5 per bin at Dollar Tree, up to about $15 for a clear two-pack at Walmart.
Match the fix to the shape, and it stops sliding back.
24. The Weekly 10-Minute Reset
Ten minutes before the grocery run is what keeps every other idea on this list from unraveling. Set a timer, toss anything past its date, wipe down the one shelf that needs it, and refill the eat-first bin with whatever has to be eaten in the next few days.
Cost: $0. You need a trash can, a damp cloth, and ten minutes. That’s it.
Do it before you shop, not after, so you buy around what’s already in there instead of duplicating it.
This is the difference between a fridge that looks good for a week and one that still works in March. A clean-out is an event. The reset is a habit.
No More Sunday Produce Funerals
That bag of liquified salad behind the ketchup bottles doesn’t have to happen again. Every wilted vegetable and forgotten leftover was a sign that your fridge needed zones, not another organizing lecture. These fixes work because they match how you actually grocery shop and cook, not some pretend version of it.
Start with the Eat-First Bin if wilted produce is your biggest heartbreak, try the Kids’ Reach Shelf if you’re tired of refereeing snack raids, or set up the Weekly 10-Minute Reset if you just need one habit that keeps it all from sliding back into chaos. Pick one zone this week. You don’t have to fix the whole fridge on a Saturday. One shelf, done right, is how this sticks.
The post 24 Fridge Organization Ideas That Stop the Sunday Produce Toss appeared first on Penny Pinchin' Mom.





 Bengali (Bangladesh) ·
 English (United States) ·